Thursday, June 26, 2014

In the Garden :: What's Growing

The potatoes have taken off, so much so that I can't get between the rows to hill them anymore. Hopefully they are growing just as well under the dirt.
The tomatoes I started from seed are doing well. I can't wait to be able to add a slice of tomato to every meal. LOL!
The peppers are beginning to hold their own enough to where I can start taking off the support tiles.
The peppers are starting to be over ran a bit by this mystery plant. It sprouted from last years seed and I'm 99% sure it's a pumpkin. We are currently working on trying to train it to grow towards the outside of the garden as to not overtake the entire pepper area.
I couldn't stand to pull it out and not let it grow. That would be just silly! 
My green beans are just not fairing so well thanks to some little critter who was feasting on half of them. Hopefully they rebound nicely.
I've got three cabbage plants thanks to a nice neighbor who shared her starts.
The cucumbers are starting to climb up the trellises Coe made for me.
I didn't get any planted last year, so I'm excited for these guys!
And the Kohlrabi is starting to get big enough to snack one. These are a great crunchy treat!


Tuesday, June 24, 2014

Bloomin ... Life on the Farm

I haven't forgotten about this new little blog of mine, I've just gotten so busy with my photography business and entertaining the kids over Summer break.
It's been hard to find the time to blog about what I love ... HOME.
There's lots of things blooming, growing, and being born!
Lot's of stories coming soon including my favorite hen returning home after being "gone" for almost two weeks and baby bunnies!!!

:: Until then, enjoy the beauty of today ::

Friday, June 13, 2014

The fairies have followed :: A Fairy Garden too!

After yesterday's post about our Gnome Garden, my MIL messaged me to say she had bought a fairy garden kit last year and hadn't had time to set it up.
She wondered if we'd like it. 
Oh my gosh, yes! This will be perfect. Ella will have one and that will keep her out of the boy's "gnome world". 
It's so super cute! 
While Ella is napping, Chase and I put it together. Again, in a metal washtub I already had planted flowers in earlier this Spring. 
 It's has an archway with gates that swing & three tiny little fairies for her to play with.
It has a little wheel barrow, a rake, a hoe, and a shovel ...
And a cute little "fairy bath" and bench ...
Such a fun activity for kids! I know Ella is going to have a ball playing with this!
Thank you Grandma!

Thursday, June 12, 2014

A Gnome Garden (a.k.a. fairy garden)

I love the craze of fairy gardens found around Pinterest, but just couldn't yet convince the boys how fun it would be to create one.
Until today ...

I found this guy at walmart for under $2.
Yes! A Gnome Garden. That's much more "manly" and something the boys could possilby be on board with. 
 Isn't he cute! We named him "Rusty".

We spent lunch surfing through Pinterest for ideas on what we would use to build him a house.
I was surprised at how excited the boys were.
I had this metal washtub already full of flowers in my flower garden so I thought it would be the pefect place for his little world.
Coe came up with the idea of using an old bird house he had built from a kit last year. It was perfect! He used a dremel tool to cut the door and he and Chase set out into our timber to find some moss. 
A little glue and it was complete!
We did a bit of "dozing" work to create an area for the house and a pathway.
Coe created a ladder for him to use and Chase was incharge of the yard area.
There are plans in the works for a hammock and a few clay mushrooms. 
I'm hoping this is something fun for them to keep adding to and keep the "we're bored" moments at bay this Summer.
Do any of you have "Fairy or Gnome" Gardens?

Wednesday, June 11, 2014

The Green House :: The First Year

 
This past February was the second year we started growing a few plants from seed.

This year we stuck to tomato and pepper plants because we found that a few plants just simply started better being directly sowed in the garden. 
We grow our seeds under lights in our basement where it's fairly warm. I don't use heat pads under the trays and have had good luck without the extra cost. I suppose it depends on your basement temperature of course.

After a few months, my little seedlings were ready to be transplanted into larger pots.
It was at this point I decided a greenhouse sure would be handy! 
Especially with the cold Spring we had I needed, a place to put all my little plants.
So, Aaron and I sat down and drew up plans. He was going to build me one!
He went to pick up the lumber and supplies and came across a kit for the Snap & Grown Hobby Greenhouse. This seemed like a much better option and it was on sale!
So, he came home with two boxes FULL of parts and a thick booklet of instructions. 
To be honest I was skeptical. I just knew it was going to blow away in the first Spring storm. 
It took him 2 nights after work just to put all the pieces together.
(It's a good thing he has way more patience than me when it comes to stuff like this.)
He then built a base for it so it stood a bit taller and had a way to anchor to the concrete we were sitting it on. 
He then built shelving for me (which also sturdied it up 100%).
He and Ella even signed it. ( I knew my sentimental side was rubbing off on him. ) LOL!
For a potting table me took an old door that was salvaged from my grandparent's house before it was tore down. This is my favorite part. I feel like while my grandma might be having a fit over the amount of dirt and dust that now covers it (she kept a dust free house), in a way she is with me every time I work at it. 
Sadly, I didn't get any photos of the close to 60 tomato plants that grew in there (I know, epic fail!)
But, I'll be sharing a some garden photos soon where 20 of them are thriving so far. 
Thank you to neighbors and friends who were willing to take a few (okay alot) of the extra plants. 
Next year, I might be brave enough to sell them at the farmer's market. 

Tuesday, June 10, 2014

Cream of Tomato Soup :: Using up last years tomato juice

Last summer we planted nearly 30 tomato plants; mainly Romas ...
We had so many tomatoes, that by the end of Summer we finally just let the chickens wonder the garden and enjoy them as well. 

My goal was to learn to can. I remember my Mom spending hours in the kitchen making tomato juice and soup to put away for later use. So, one afternoon last Summer she spent the day teaching me, just the way her Mom had taught her. 

I was happy to bring home jars of juice and soup for the winter!
The kids LOVE the soup and while we used many jars of the juice making chilli we still have an abundance left on the shelves.
 
So, one day last week we made Cream of Tomato Soup (Using Homemade Tomato Juice)
This soup is perfect on a cool rainy day like today!
Pair it with grilled cheese and it will be a hit with kids of all ages!

**Note: I wrote this recipe down in my notebook and didn't make a note of where I found it on the web. As soon as I figure that out I will reference the source.**

Cream of Tomato Soup
2/3 c. real butter (not margerine)
1/2 c. flour
6 c. tomato juice
1/2 tsp. baking soda
4-5 c. milk
2 tsp. sugar
2 tsp. salt 

1. In a large sauce pan, melt butter over med. heat. Then wisk flour until smooth.
2. Add tomato juice until it thickens.
3. Whisk in soda, 4 c. milk, sugar, & salt. Cook until heated through. If you want creamier soup, add more milk. 
Notes: I used whole milk and actually added more salt to taste.


Monday, June 9, 2014

Say Hello to :: Pistal Annie

Back in early April we were invited out to a friends family's farm to play with some adorable baby goats. They were only about a week and a half old at the time.

We haven't had goats on our farm for approx the last 7 years, & while they are a pain in the booty to keep in, they were such great fun to have. We had BOER goats in the past (which is a meat goat) and while I love their look I would really love to have a milk goat.

So, I've been talking to my hubby (okay begging him) to let me get a milk goat. And, after acquiring the new shed from the neighbor I just felt like it needed a little goat to live in it.
Yesterday, a few phone calls were made and we went back to the friend's family's farm to pick out a baby goat! Eeek! I was super excited!

I picked out a little doe who has one white leg (she is the baby in the back of the above photo).
Her momma is a NUBIAN (she is the brown and white speckled one in the center of the below photo) and her daddy is a BOER.


She is spunky and her first introduction to our house consisted of jumping so swiftly against the gate of her enclosure that she broke out and took all five of us on a wild "goat chase" across our back pasture. Good Lord those things are fast and can leap like you wouldn't believe!
We finally got her back in and thanks to a few suggestions on Facebook we found her name :: Pistal Annie.
Very fitting I have a feeling.

I love her long lashes ...
and big floppy ears ...

 It took a few hours to get her to warm up to us, but by the end of the evening the kids (of the human sorts) were sitting next to her and she was enjoying being petted. 

I've got a lot of work and research ahead of me but I'm looking forward to learning more about milk goats and I hope she loves it here!

Friday, June 6, 2014

Something New to the Farm

Thanks to a neighbor friend who was wanting it out of his yard, we inherited this fun little shed and fencing. It made the move here last night and I can't wait to see what it holds for us in the future. 
A milk goat, some turkeys, a peacock, <<< ummm no; peacocks are very much off limits! 
Don't get me wrong, they are beautiful creators, but I have no use for their 'roosting on vehicle' habits. 
I haven't decided yet whether I'm going to paint the shed gray or leave it as is. I sort of want to give it a fresh look yet make it blend in nicely. 
The fencing isn't set up completely and that's on the weekend to do list as well.
What's your vote :: paint it gray or leave it as is?

Thursday, June 5, 2014

A Jersey Nose :: Farm Print for Sale


I have had an over whelming amount of request to offer prints of this photo; so here it is!

All orders will be drop shipped directly to your door!
Contact me at meganklauer@yahoo.com to place your order!


8x10 print              $15.00
11x14 print            $25.00
16x24 print            $45.00
8x10 stand out        $40.00
11x14 stand out      $75.00
16x24 stand out        $100.00
8x10 gallery wrap   $70.00
11x14 gallery wrap   $100.00
16x24 gallery wrap   $130.00

Wednesday, June 4, 2014

Garden Boxes :: A Good Place to Start

"So, I saw this idea on Pinterest ..." a typical start to a sentence these days. Right?

Lucky for me, my hubby is usually pretty willing to help me figure out how to create or recreate what I had seen.
Two years ago I presented to him the idea of building garden boxes; one for each of our kiddos. 
They each got to choose what they wanted to plant in their box and were in charge of keeping the weeds at bay. 
At the time, this was our only garden so we kept it pretty simple.
Chase wanted strawberries, Coe wanted green beans, and Ella was up for helping Mommy with whatever; because at the time she was only Two. 

Last year, we added a bunch more strawberry plants to Chase's; thanks to some generous friends.

Coe's box was filled with sweet potatoes and bunching onions.
 

Ella's box was dedicated to Snap Peas, Pole Beans, and Zucchini. Coe build a wonderful trellis (again an idea from Pinterest) for the peas & beans to vine up.

This year, just as the season is getting started we are changing things up once again.
The first two boxes are now dedicated to strawberries. (Chase's plants from last year are beginning to venture their way out)

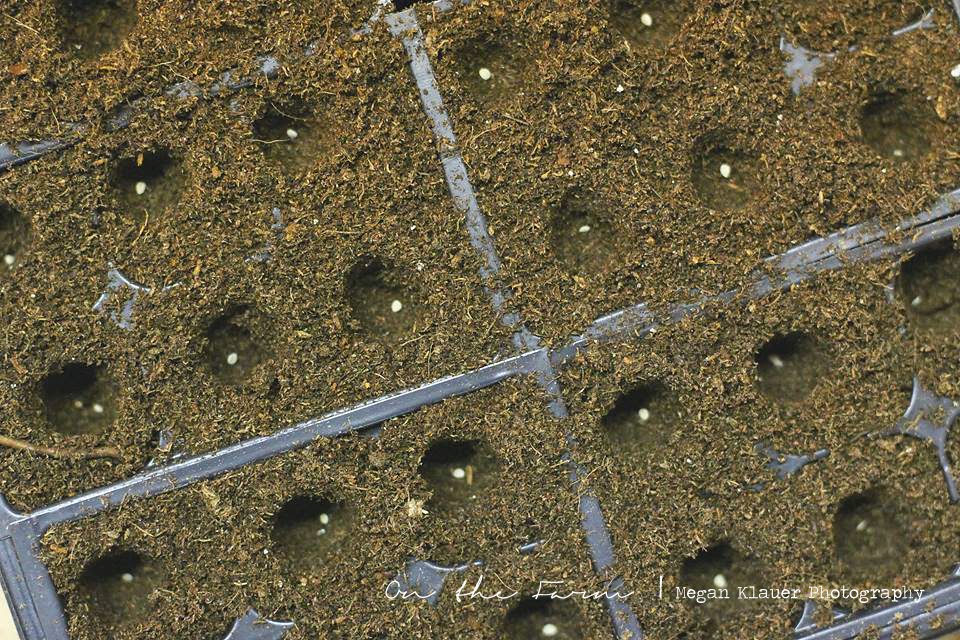
Coe's box is also going to be strawberries now as well, but looks pretty bare since these were just transplanted a few weeks ago.
However, if all goes well his will look like this in no time.
We moved the trellis so that it straddles the middle and last box in order to get better use of the area. This way we were able to plant the Snap Peas just on the edges. 
Note: I skipped the pole beans this year. They just weren't as good as the bush beans in my opinion.
Ella's box is full of lettuce, radishes, carrots, and two zucchini plants.
Thanks to one of my hens who refuses to stay in her coop we had to put some chicken wire to use. 
(I'm afraid the next step is going to be figuring something out to protect my strawberries.)

The Snap Peas are just starting to work their way to the chicken wire on the trellis.
If you haven't tried these before; DO! They are so yummy and very rarely make it to the house becuase the kids love them so much. In fact this year, I only planted half of them now and will start another batch in a few weeks in order to extend the season a bit.
I also planted a veining flower called Nasturtium which are supposed to help with keeping the squash bugs at bay. I had a HUGE problem with those awful things last year!
 Our garden boxes measure 14 feet by just over 4 feet. We filled them with black dirt, compost from our compost pile, a bit of wood ash from our outdoor wood burner, and added mulch between the boxes that we got from our local Preschool when they were redoing their play area.

If you garden in boxes, I'd love to hear what works for you!

Disclaimer: I am NO expert; in fact, I'm far from it! I'm just a mom trying to grow a few things for my family and capturing it all along the way.